
Quilting
Quilting 101: How to Press Quilt Seams
Have you ever looked at a beautiful quilt and wondered what makes it look so polished and professional? The answer might lie in a seemingly small detail: how the seams were pressed. Pressing is about more than removing wrinkles—it affects the way your quilt lays and how smooth the quilting turns out.
No one wants a lumpy, bumpy quilt, right? Well, that’s what would happen if you didn’t put any thought into how the seams were pressed. Bulky seams would make it difficult for your quilt to lay flat, and you’d have trouble quilting the layers whenever going over a seam.
But here’s the thing… not everyone agrees on the how to press quilt seams. In this post, I’ll show you a couple of different ways to press quilt seams, when you should choose each method, and ultimately how it will affect the final look and feel of your quilt.
Choose Your Pressing Direction
There are two ways you can choose to press quilt seams—open or to one side. Each method has its pros and cons.
Pressing seams to one side offers the advantage of stronger seams and creates convenient nesting points for matching seams in your quilt blocks. This method also simplifies stitch-in-the-ditch quilting because it creates a small divot that is easy to follow. Plus, when you press seams to one side, you can hide the lighter color fabric behind the darker color fabric so that no shadowing is visible on the front side of your quilt. That’s why you’re often told to “press seams to the dark side.” However, pressing seams to the side is not without its drawbacks… The extra bulk created at the seam by pressing to one side can slightly alter the dimensions of your blocks and pose challenges during free motion quilting.
On the flip side, pressing seams open reduces bulk and results in a flatter quilt top, which is ideal for intricate free motion quilting designs. The drawback is that it requires more time and effort to meticulously wiggle each seam open, and the resulting seams aren’t as strong or easy to match up.
So, how do you choose how to press quilt seams? Consider your quilting style and preferences. If you lean towards stitch-in-the-ditch quilting, pressing seams to one side might be your best bet. On the other hand, if you’re a free-motion quilting enthusiast, pressing seams open could be the smarter choice.
For longer seams, like borders or sashing, pressing open is generally recommended to prevent distortion and puckering. However, don’t be afraid to mix it up! A combination of both methods can offer the best of both worlds, allowing you to tailor your approach to each individual project. Take the time to plan ahead and your quilt will be amazing.
Pressing Tips
There’s more to pressing than choosing which way the seams should go. Here are some tips for how to press quilt seams that will help you get better results:
1. Press Quilt Seams on a Wool Pressing Mat: Wool has amazing heat-retention properties. It helps you get flatter quilt seams because the heat from your iron is absorbed by the wool mat so you heat the seams from both sides. Plus, you don’t have to use steam or spray starch which can distort your blocks.
Also Read: 4 Reasons Why Quilters Should Use a Wool Pressing Mat
2. Press Seams As You Sew: Don’t wait to press your quilt seams until the very end. It’s better to do it in batches as you are piecing blocks together. This helps you nest seams easier and start out flat.
3. Finger Press the Seams First: Before you run your iron along a seam, it helps to use your finger first to get the seam going in the right direction. It can help prevent puckers.
4. Check Your Pattern for Pressing Suggestions: A lot of the time, your quilt pattern will tell you which way to press quilt seams. This saves you time and headache in planning.
5. Press, Don’t Iron: Use an up-and-down motion to press quilt seams rather than sliding the iron back and forth. This gentle lifting motion prevents distortion, ensuring your seams remain straight and accurate.
6. Protect Your Fingers: Use Hot Iron Finger Protectors when pressing intricate quilt seams so you can hold the seams down all the way until the iron is touching them.
7. Don’t Rush the Pressing Process: Take your time to ensure each seam is pressed thoroughly and evenly. Then, inspect your work to check for seam puckering.
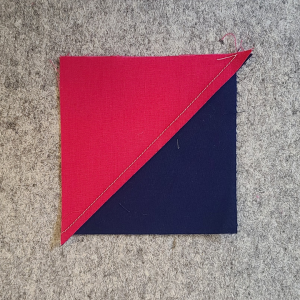
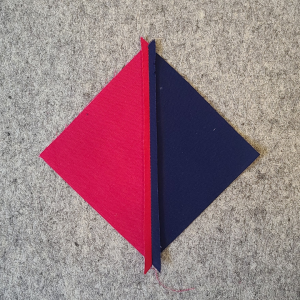
Demonstration: How to Press Quilt Seams
Pressing seams to one side is the easiest method. Begin by giving the pieces a quick press to set the seams. Then, start with the dark side on the top and gently pull the top piece open to the side, ensuring that the quilt seam stays flat with the dark side of your fabric. Press the seam so that it stays in place. Once you’ve pressed your seam, flip your fabric over and ensure that the seam lies flat and smooth on the back. If there are any wrinkles or puckers, re-press as needed. I like to do this on a wool pressing mat and use a quilter’s clapper to keep the seam flat as it cools.
To press seams open, lay the block out flat with the wrong side up. Open the seam with your finger a little bit to get it started. Then, run the iron along the inside of the seam. You might want to use the nose of the iron to wiggle it a little bit as you go to tease the seam open. Hold the iron there for a few seconds and then let go. Flip it over and press on the top, too. You can use a quilter’s clapper to cool the seam here, too.
Let me know if you have any questions on how to press quilt seams. Leave a comment below.