If you want to work on any sewing or quilting project, you need to know how to use a seam ripper. It’s a little tool used to remove unwanted stitches when you make a mistake. Seam rippers have a sharp point for getting underneath stitches, a small knife edge for cutting, and a ballpoint tip for protecting your fabric from the knife. No sewing kit is complete without one!
You’re going to make mistakes… I have been sewing for 20+ years and I still find myself unpicking seams from time to time. So, don’t feel bad when you need to reach for your seam ripper.
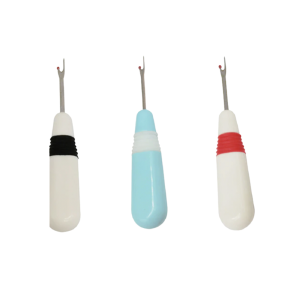
Most seam rippers look about the same and work the same way. Although, I prefer using one with an ergonomic handle. The most important thing to remember when using a seam ripper is to keep the sharp end pointed away from your body for safety.
I’ve outlined how to use a seam ripper below. There’s more than one “right” way! Your choice will depend on the fabric you’re working with, where the stitches are located on your project, and how short your stitch length is.
1. One Quick Run
The fastest way to remove stitches from a seam is to work from the right side of your fabric and position the seam ripper so that the ballpoint goes underneath the row of stitches and the point is on top of the seam. Then, you push your seam ripper down the seam in one quick run. All the stitches get cut and you just brush off the little pieces of thread that are left behind or use a lint roller.
When to Use It: This method works best on projects where you need to remove a lot of stitches at once. However, it only works for sturdy cottons and other stable fabrics. It’s much too risky to use a seam ripper this way on delicate fabrics like satin and most knits. You could easily rip a hole in your fabric!
2. Cut a Thread and Rip
Another way to remove stitches is to slip the sharp point of the seam ripper underneath a stitch at the beginning of a seam and cut it with the knife. Then, pull the two pieces of fabric apart at the seam to rip the next few stitches out. When they will not rip anymore, cut another stitch and repeat the process.
When to Use It: Again, this isn’t a good method if your fabric is delicate because it can stretch out the weave of your fabric or cause runs or noticeable damage.
3. Pull One Thread
One of my favorite ways to remove stitches is to cut one stitch with a seam ripper and then smoothly pull out the thread from the end of the seam. This creates no mess because you don’t have little cut pieces of thread everywhere when you’re done.
When to Use It: This method works best when removing a seam with a long stitch length, such as a basting stitch. It also works well on fabrics that have a loose weave.
4. Remove One Stitch at a Time
Unfortunately, there are times when you won’t have any other option than to remove stitches one at a time. To do this, slip the pointed end of your seam ripper under a stitch and cut it. Then, move on to the next stitch and do the same thing…
When to Use It: You might have to remove one stitch at a time if you’ve used a short stitch length, your fabric is very delicate, or you need to remove stitches from a tight area on your project.
I hope you can master the technique of how to use a seam ripper. You’ll get better at it and faster the more you practice.
Need a NEW Seam Ripper?
Whether you’re new to sewing, or you’ve been sewing for years, a good quality seam ripper is your friend. I personally have seam rippers all over my sewing space—one by my sewing machine, one at my cutting table, a backup in the drawer next to my sewing supplies, etc. You can never have too many!
Get yourself a new, ergonomic seam ripper tool today?
Did You Know: You should replace your seam ripper every year or two? The little blade goes dull over time, and you want it to be sharp to effectively unpick stitches.
How many seam rippers do you have? Let me know in the comments below.